
Master the Split Valorant Map with our in-depth guide. Gain strategic insights and tips to conquer key areas, coordinate attacks, and employ defenses effectively for victory.
Split is one of the most difficult maps to master in Valorant.
Split is a large map, with a distance of about 10 meters between the two Spike sites. It is complex and difficult to master, requiring a good knowledge of the area to spot and trap your opponents.
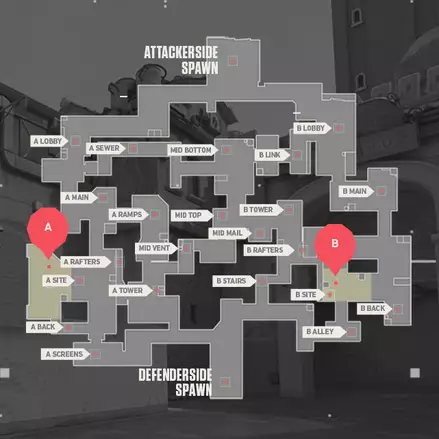
Split minimap – copyright Riot Games
In the realm of competitive first-person shooters, the intricacies of a battlefield can be the determining factor between victory and defeat. Your understanding of the Split Valorant Map is pivotal, as this arena is more than just a backdrop for skirmishes but a chessboard that demands strategic acumen and situational awareness. With its multifaceted verticality and distinct zones, the Split Valorant Map offers a complex landscape where your tactical prowess will be both challenged and rewarded. This comprehensive exploration of the map will provide you with the insights necessary to navigate the avenues of combat and utilize the environment to your strategic advantage.
Overview of Split Map
Split is one of the most dynamic and intricate maps in the tactical shooter game Valorant. With its distinct style and engaging gameplay, it holds a significant place in the map pool. Its design facilitates a range of strategies and offers various opportunities for both defenders and attackers to harness their team’s potential.
Design Aesthetics and Theme
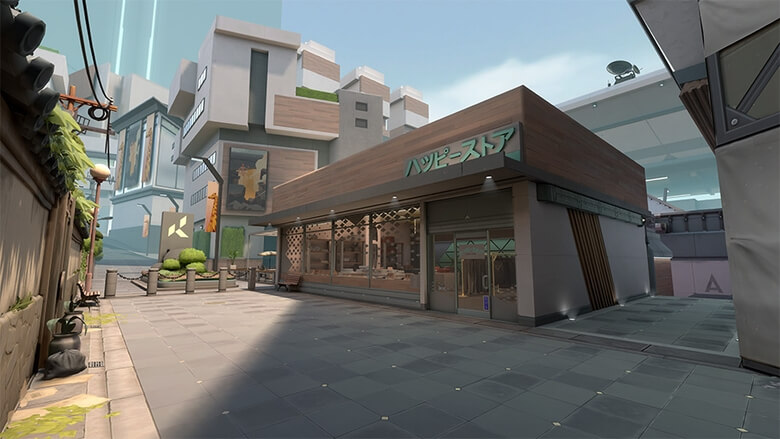
Split is characterized by its sleek, neo-tokyo aesthetic, infused with traditional Japanese architectural elements. The contrasting environments of the futuristic cityscape and historic buildings give it a unique feel that stands out among the other maps in Valorant. Neon signs and holograms intermingle with paper lanterns and wooden accents, creating an immersive environment that is as beautiful to look at as it is to play in.
Map Layout and Key Areas
The map is divided into several critical areas, with two main bombsites, A and B, and a central area that connects them both, known colloquially as ‘Mid’. The layout features narrow chokepoints, vertical elements like ropes for quick elevation changes, and open areas that necessitate sharp aim and tactical positioning.
Importance in Valorant Map Pool
Split holds a very important position within the Valorant map pool, challenging players with its tight angles and requiring sound teamwork. The combination of close-quarter and long-range engagements tests the versatility of the players and their ability to adapt strategies on the fly. Its presence in the competitive rotation continues to have a significant impact on the evolution of play styles and meta within the game.
Map Layout Specifics
Overview of Bombsites A and B
Bombsite A is a layered area with multiple levels and a heaven position that overlooks the site, allowing defenders multiple angles of control. In contrast, Bombsite B is more enclosed, with a site that demands close-quarters combat and a high ground known as ‘B-Tower’, which offers a vantage point for defenders.
Mid Control Significance
Securing control over Mid can often dictate the tide of the round as it provides additional routes to both bombsites and extensive map control. The significance of Mid comes from its two main areas: ‘Vent Room’, which provides a quick rotation to A, and ‘B Link’, a connector to B site.
Callouts and Common Terms
Understanding callouts is essential to effective communication and strategy. Key terms for Split include ‘Ramps’ for the inclined platform leading to A Heaven, ‘Garage’ being the entry point to B from Mid, and ‘Screens’ referring to the area on A site close to defender spawn with electronic panels.
Attacking Strategies
A Site Execution
When executing A, it’s crucial to gain control over Ramps and A Heaven to establish a strong post-plant situation. Pushing through A Main and using utility to block sightlines from Heaven and Screens can be an effective approach to secure the site.
B Site Execution
For B, attackers need to be wary of defender positions in B Tower and the back of site. Utilizing smokes to block key sightlines and flashes to clear close corners can enable an effective B site take.
Mid Control Tactics
Gaining Mid control can be achieved by overpowering defenders in Vent Room or B Link. Attacking teams often deploy smokes to obscure vision from Mid to B Heaven or A Heaven, making it safer to push through to the sites or to maneuver for picks.
Defensive Strategies
Holding A Site
Defending A site requires attention to A Main, Ramps, and Mid. Placing agents that can delay pushes with slows or area-denial abilities can be effective in preventing a successful site take.
Controlling B Site
On the B site, it’s important to maintain control of B Tower and the space around the site. Utilizing utility that can disrupt rushes or quickly gather information like tripwires or recon bolts can solidify B site defense.
Mid Area Defense
Controlling Mid often involves a mix of aggression and information gathering. Defenders can opt to confront attackers head-on for early picks or play retake, allowing attackers to commit before reengaging with coordinated utility.
Utility Usage on Split
Effective Smokes and Line-ups
Smokes are pivotal on Split as they can block crucial sightlines. Knowing line-ups to consistently place smokes onto spots such as B Heaven or A Screens without exposing yourself can turn the tide of any round.
Essential Flashes and Stuns
Flashes and stuns are used to clear angles or disrupt defender setups. Effective use of these on common defender positions can enable a team to safely take control of key areas.
Optimal Molotov and Grenade Spots
Molotovs and grenades can flush out enemies from strongholds or deny bomb plants/defuses. Placing these correctly on A Rafters or behind the boxes on B site, for instance, could force opponents into unfavorable positions.
Agent Composition and Synergy
Top Agent Picks for Split
Selecting agents that thrive in tight spaces and can provide strong site control, like Sage for her barriers and heals or Raze for her explosive potential, can be highly effective on Split.
Synergizing Abilities and Team Composition
Building a team composition where abilities complement each other, like combining Sova’s recon abilities with Breach’s entry disruption, can maximize efficiency in both taking and holding sites.
Substitutable Agents and Flex Picks
Flex picks such as Omen or Viper can provide smokes while also having secondary roles, offering adaptability in agent composition. Knowing when to substitute agents to better fit the team’s playstyle or strategy is vital.
Map Rotation and Timing
Timings for Defenders
Defenders should understand the timing needed to rotate from one site to the other. Quick and well-timed rotations can stop attackers in their tracks or provide essential support during a retake.
Attackers’ Rotation Strategies
Attackers benefit from mastering rotation timings to create pressure across the map, thus confusing the defense and splitting their attention. Decisive rotations can exploit the defenders’ movements and catch them off-guard.
Importance of Sound Cues and Map Control
Sound cues are critical; footsteps, ability usage, and spike planting sounds can all provide valuable information. Maintaining map control and awareness allows for accurate predictions of enemy movement and site execution.
Economy and Buy-Rounds
Economical Approach to Split
Understanding the importance of economic management can be the difference between a full buy round and being stuck with suboptimal gear. Balancing buys and ensuring the possibility of future full buy rounds is essential for success.
Buying Strategies for Attackers and Defenders
Attackers and defenders have different considerations, such as when to invest in rifles or opt for a save round. This decision-making can help maintain pressure on the opposing team while not compromising your own economic standing.
Save Rounds and Force Buys
Making strategic decisions between save rounds and force buys can turn the tides of a match. A well-timed force buy can catch an opposing team off guard, while an effective save round can bolster the economy for future rounds.
Post-Plant and Retake Scenarios
Strategizing Around Bomb Sites After Planting
Once the spike is planted, attackers need to set up for defense. Choosing post-plant positions that provide crossfires and cover is important to counter any retake attempts by defenders.
Retake Techniques and Coordination
Defenders require coordinated retakes to successfully defuse the spike. Using utility to push attackers out of position combined with timed pushes from multiple angles can help regain control of a site.
Post-Plant Ability Usage
Using abilities post-plant can delay defuses and protect the spike. For instance, post-plant mollies can prevent a defuse or a well-timed recon dart can reveal the enemy’s position during a retake.
Split History and Evolution
Changes from Initial Release
Since its initial release, Split has seen several changes aimed at balancing gameplay, such as adjusting chokepoints, altering site layouts, and modifying specific areas to promote more strategic play.
Community Reception and Pro Play Influence
The reception from the Valorant community and the impact of pro play has shaped Split’s evolution, with feedback leading to further tweaks and adjustments. Professional matches have showcased the depth of strategies possible on Split.
Future Prospects and Map Updates
With Valorant’s developers committed to keeping the gameplay fresh, Split is likely to continue evolving. Future updates could introduce new dynamics to the map, ensuring its place in competitive play and community engagement.