
Explore the ins and outs of Valorant’s Breeze map! Dive into strategic tips, key locations, and agent synergies to dominate the competition. Master Breeze now!
In the evolving landscape of Valorant, the Breeze map stands as a notable addition to your strategic repertoire. With its vast, open spaces and a refreshing coastal backdrop, Breeze challenges you to adapt your playstyle to suit its unique environmental demands. This article provides an in-depth analysis of the Breeze Valorant Map, offering insights into its design intricacies, strategic vantage points, and tips to master control of its expansive territories. Your competitive edge will sharpen as you learn to navigate the tropical terrain of Breeze, exploiting its potential to outmaneuver opponents and secure victory.
Breeze is the sixth map in Valorant, added in Act 3 of Episode 2.
The Breeze map is more complex than the other maps, it is a map with multiple open areas, with many branches in its corridors.
Breeze minimap – copyright Riot Games
Overview of Breeze
Breeze presents an intriguing landscape for tactical gameplay, characterized by its expansive features and distinct design principles. It stands apart in the collection of available maps, offering unique challenges and strategies to master.
Geographical setting and inspiration
Set amidst a backdrop of historical ruins on a remote island, Breeze captures a fusion of tropical vibes and ancient architecture. The design inspiration is derived from picturesque, open spaces reminiscent of the Caribbean. This unseen blend in combat environments offers not only a visually refreshing experience but also introduces novel gameplay dynamics.
Map size and open spaces
Breeze is notable for its size, being one of the largest maps in the game, emphasizing long sightlines and spacious areas. This vastness promotes engagements at a distance, steering players to prioritize precision aiming and tactical positioning over close-quarters skirmishes.
Gameplay style encouraged by map design
The map design encourages a variety of gameplay styles, with a particular emphasis on strategic play and teamwork. While riflers can excel with the long angles, there are also ample opportunities for snipers to dominate sightlines. The open design allows creative uses of abilities, promoting a tactical approach to both attacking and defending objectives.
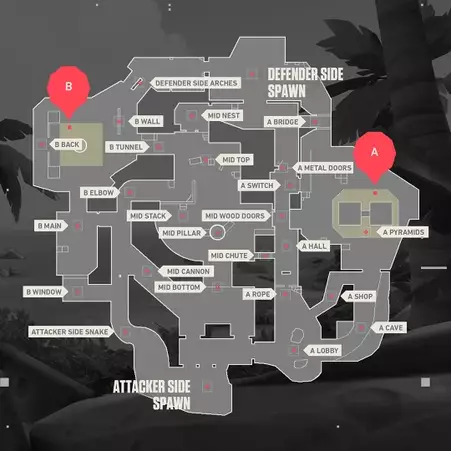
Map Layout
Breeze has a layout that offers multiple strategic facets for players to explore and utilize in their gameplay, with a special emphasis on mid-map control.
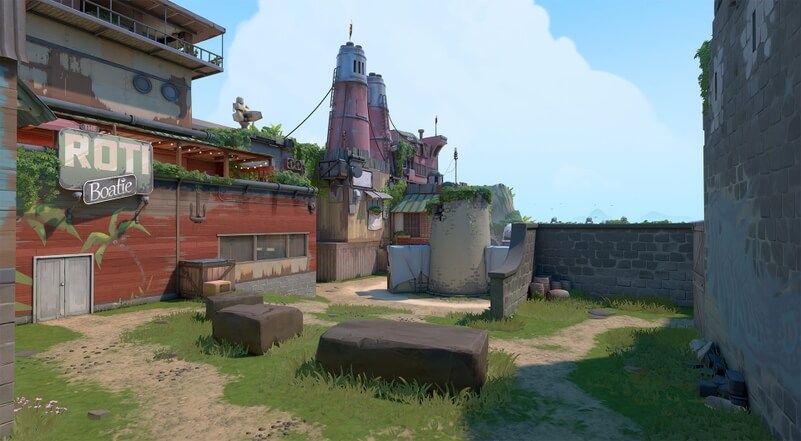
Bombsite A
Bombsite A features a large, open playing area with several cover points, including Tetris and Pyramid. The layout supports long-range engagements and provides attackers with multiple entry points. This complexity necessitates astute angle holding and site retakes from defenders.
Bombsite B
Conversely, Bombsite B is more enclosed, with a significant choke point through B Main. It is sheltered compared to Bombsite A and demands tight team coordination for successful attacks or defenses. Post-plant scenarios at B often lead to intense close to medium-range encounters.
Mid Area
The Mid Area is a crucial battleground for map control, positioned centrally with routes leading to both bombsites. Controlling it provides strategic advantages, allowing for quicker rotations and pincer movements against opponents. The design features cover points and elevation changes to add complexity to engagements.
Defenders’ Spawn
This spawn area gives defenders immediate access to both sites, with a positionally advantageous pathway leading to Mid. The layout facilitates quick transitions between sites, helping defenders adapt to the attackers’ maneuvers.
Attackers’ Spawn
The Attackers’ Spawn area is situated at a considerable distance from the bombsites, giving defenders time to set up. However, the spawn has multiple exits leading to different engagement points, enabling a diverse set of attack strategies.
Connecting paths and corridors
The map includes numerous paths and corridors interconnecting the main areas, such as Elbow and Hall, which offer additional manoeuverability around the map. These connector areas are vital for flanking and surprise attacks.
Key Locations and Features
Certain areas on Breeze hold high strategic importance and are notable for their impact on the game’s flow.
A Hall
This is a narrow pathway that leads directly to Bombsite A, offering a direct, though risky, route for attackers. Defenders can utilize this alleyway to flank attackers focusing on the main choke points.
B Main
B Main acts as the primary attacking thoroughfare to Bombsite B, where defense setups often concentrate. The entryway’s width is deceptive, with attackers having to check multiple angles upon breach.
Mid Pillar
The Mid Pillar provides essential cover within the Mid Area and is a focal point for skirmishes. Control over this feature can dictate the pace and direction of a round, with the victor gaining a strategic high ground.
A Main/Shop
Providing a direct route to Bombsite A, A Main, also known as Shop, is a critical location for attackers. The area allows for staging quick site hits or feints, making it a prime target for utility expenditure from both sides.
Vent
The Vent offers a sneaky passage connecting the Mid Area to Bombsite A, enabling rapid rotations. It is a double-edged sword, as it also serves as a sound cue, potentially revealing strategic movements.
Tunnel
This underpass connects the Mid Area to B Main, giving another rotation path to circumvent main choke points. It remains pivotal for stealthy plays and coordinated mid-B splits.
Map Strategies
On Breeze, the wide playing field combines with the unique layout to birth diverse strategies.
Default strategies for Attackers
Attackers generally employ a split approach, taking control of Mid to force defenders to spread thin, or committing to a unified push to overwhelm a bombsite. Probing for picks and gathering information before committing is often part of the default strategy.
Default strategies for Defenders
Defenders tend to focus on maintaining control of Mid while setting up crossfires at both bombsites. Flexibility and quick rotation are the keys to countering the attackers’ plays.
Mid control importance
Dominance in the Mid Area can be a game-changer, as it gives the controlling team a strategic vantage for rotations and map pressure. Both sides often allocate significant resources to clinch control of this territory.
Post-plant positioning
Given the open spaces, post-plant scenarios are complex and require mindful positioning. Teams must ensure they have clear sightlines for the defusal while maintaining advantageous post-plant setups to fend off retakes.
Agent Synergies
Certain agents find their skillsets amplified on Breeze due to the map’s design.
Best agents for Breeze
Agents with abilities that can exploit long sightlines like Viper or facilitate quick rotations such as Omen shine on Breeze. Initiators that can gather intel or control large areas, including Sova or Skye, also prove vital.
Agent abilities and map features
The vast expanses of Breeze allow for expressive use of abilities. Whether it’s using smokes to block extensive sightlines or leveraging recon tools to uncover enemy positions, agents need to utilize the breadth of the map features to maximize their impact.
Team compositions for optimal control
A balanced composition that includes duelists for entry-fragging, controllers for area denial, and sentinels or initiators for information and flank protection creates the optimal control scenario. The synergy between long-range capability and utility usage is crucial.
Tips and Tricks
To keep an edge on Breeze, understanding some nuanced strategies can prove pivotal.
Utility usage for gaining an edge
Well-placed utility can force opponents out of key positions and obscure long sightlines. Each ability cast should have a particular intent, either to gain territory, deny enemy movement, or secure a plant or defuse.
Common angles and pre-fire spots
To excel, one must be familiar with common angles and pre-fire spots, especially in areas where engagements are frequent. This knowledge can give the split-second advantage needed to win duels.
Spike plant positions and post-plant setups
Choosing optimal spike plant positions that accommodate a safe defense, considering the vast open spaces for post-plant setups, is essential. Teams need to understand the most favorable positions for their chosen strategies.
Breeze-specific movements techniques
Breeze’s long sightlines and spacing may be punishing; however, with adept movement, players can cross dangerous areas with minimized risk. Understanding how to mix movement techniques such as jumps and crouches can help one evade enemy detection.
Economic Aspects on Breeze
The economic dimension plays a vital role in determining team strategies on the map.
Buy round strategies
During buy rounds, investing in weapons suited for long-range engagements is common. Teams might adjust their purchases based on which areas they plan on contesting or defending.
Impact of long distances on weapon choices
The long distances on Breeze influence weapon choices, with sniper rifles and rifles often being preferred. However, shotguns and SMGs can still be effective in tight spaces or surprise plays.
Eco and force-buy rounds
On eco and force-buy rounds, teams may resort to stack strategies or aggressive pushes to offset their disadvantage in firepower. Utilizing less expensive utility effectively becomes even more critical.
Common Tactics Encountered
Breeze’s multifaceted landscape hosts a variety of tactics.
Rush tactics
Fast-paced strategies can catch opponents off-guard, but Breeze’s open areas make rushes riskier due to the easy line of sights for defenders.
Default plays
Most teams have a default play that leverages map control and information gathering, often pivoting to take advantage of any defender weaknesses discovered.
Flanking and lurking
A successful flank can turn the tide of a round, and lurkers can be a menace in the vast terrain of Breeze, especially when navigating the connecting paths and corridors.
Off-angle holding
Due to the map’s long lines of sight, off-angle holding can be a valuable tactic for defenders, allowing them to catch attackers off guard as they check common positions.
Map Adjustments and Updates
Breeze, like any live map, experiences adjustments to maintain balance and freshness.
Changelog of Breeze
The changelog for Breeze chronicles the incremental updates made to various aspects of the map, from altering cover positions to tweaking bombsite areas to enhance the competitive experience.
Impact of updates on gameplay
Every update can have a profound impact on gameplay. Small changes may force teams to rethink well-established strategies or create entirely new plays.
Community response to changes
The competitive community’s response to changes tends to be mixed, with adjustments sometimes leading to intense debate over the merits of the map’s evolving tactical landscape.
Tournaments and Competitive Play
Competitive play on Breeze tests the mettle of even the most experienced teams.
Breeze’s reception in the competitive scene
Since its introduction, Breeze has received a mixed reception in the competitive scene. Its distinctive play style and challenges have been embraced by some, while others criticize the stark departure from traditional map design.
Noteworthy matches on Breeze
Many matches on Breeze have already gone down in history for their showcase of mastery over the unique elements of the map, setting the standard for high-level play.
Map selection and veto process in tournaments
Breeze’s inclusion or exclusion during the map selection and veto process in tournaments often hinges on a team’s confidence in their ability to navigate its complexities. Its status can significantly influence the outcome of a series.